DedeCMS 的表单(通常指自定义表单或会员/投稿表单)生成的 HTML 代码结构比较固定,但默认样式非常朴素,通过 CSS,我们可以轻松地美化它,使其与网站整体风格保持一致,提升用户体验。
下面我将分步进行讲解,从最基础到更高级的定制。
第一步:理解 DedeCMS 表单的 HTML 结构
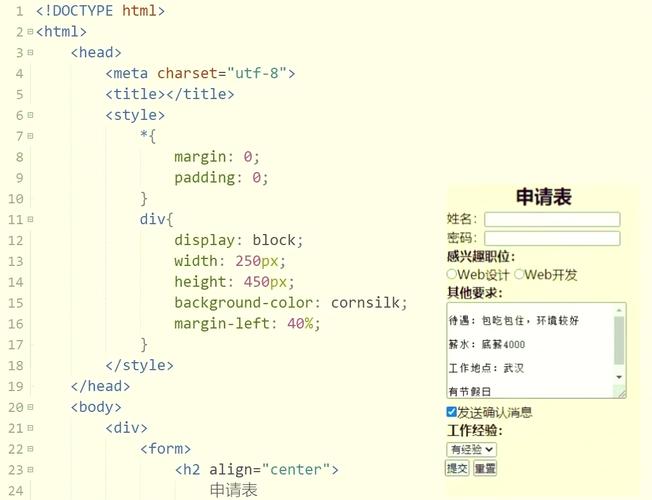
在写 CSS 之前,我们必须先知道 DedeCMS 生成的 HTML 长什么样,以一个常见的自定义表单为例,其结构通常如下:
<form action="/plus/diy.php" enctype="multipart/form-data" method="post">
    <input type="hidden" name="dede_fields" value="name,text;tel,text;content,multitext;file,file">
    <input type="hidden" name="dede_fieldshash" value="a3b2c1d4e5...">
    <!-- 表单字段 -->
    <p>
        <label for="name">姓名:</label>
        <input type="text" name="name" id="name" class="intxt" style="width:250px">
    </p>
    <p>
        <label for="tel">电话:</label>
        <input type="text" name="tel" id="tel" class="intxt" style="width:250px">
    </p>
    <p>
        <label for="content">内容:</label>
        <textarea name="content" id="content" rows="6" cols="60"></textarea>
    </p>
    <p>
        <label for="file">附件:</label>
        <input type="file" name="file" id="file" class="intxt" style="width:250px">
    </p>
    <p>
        <button type="submit" name="submit" class="btn">提交</button>
    </p>
</form>
关键点分析:
<form>:整个表单的容器。<p>:DedeCMS 默认会用<p>标签包裹每一个表单项(包括 label 和 input),这是我们布局和样式化的主要单元。<label>:用于描述表单字段,点击label可以聚焦到对应的输入框,这对用户体验很重要。<input>,<textarea>:实际的输入控件,DedeCMS 通常会给它们一个class="intxt"。<button>:提交按钮。
第二步:编写基础 CSS 样式
我们针对上面的 HTML 结构来写 CSS,我们将 CSS 代码放在模板的 <head> 标签内的 <style> 标签里,或者单独创建一个 .css 文件并在模板中引入。
整体容器样式
给整个表单加一些外边距,让它不会紧贴着其他内容。
/* 找到 form 标签,设置宽度、外边距和内边距 */
.dede-form { /* 建议给表单加一个 class,如 dede-form,以便精准控制 */
    width: 500px;
    margin: 20px auto; /* 上下20px,左右自动居中 */
    padding: 20px;
    border: 1px solid #e0e0e0;
    border-radius: 5px; /* 圆角 */
    background-color: #f9f9f9;
    box-shadow: 0 2px 5px rgba(0,0,0,0.1); /* 轻微阴影 */
}
表单项布局
默认的 <p> 标签有上下间距,我们可以调整它,并让 label 和 input 在一行显示。
/* 调整每个表单项 <p> 的样式 */
.dede-form p {
    margin-bottom: 15px; /* 项与项之间的间距 */
    display: flex; /* 使用 flex 布局,让 label 和 input 在一行 */
    align-items: center; /* 垂直方向居中对齐 */
}
/* 调整 label 样式 */
.dede-form label {
    width: 80px; /* 固定 label 的宽度,使所有输入框对齐 */
    text-align: right;
    margin-right: 10px;
    font-weight: bold;
    color: #333;
}
/* 让 input 和 textarea 占据剩余空间 */
.dede-form input[type="text"],
.dede-form input[type="file"],
.dede-form textarea {
    flex: 1; /* 让它们填充父容器 p 的剩余宽度 */
    padding: 8px;
    border: 1px solid #ccc;
    border-radius: 3px;
    font-size: 14px;
    transition: border-color 0.3s; /* 鼠标悬停或聚焦时的过渡效果 */
}
/* 鼠标聚焦时的样式 */
.dede-form input[type="text"]:focus,
.dede-form input[type="file"]:focus,
.dede-form textarea:focus {
    border-color: #5a9fd4;
    outline: none; /* 去除浏览器默认的轮廓线 */
}
文本域 样式
文本域通常需要更大的高度,我们可以单独设置。
/* 单独设置文本域的高度 */
.dede-form textarea {
    min-height: 120px;
    resize: vertical; /* 允许用户垂直调整大小 */
}
提交按钮样式
按钮是表单的“门面”,需要重点美化。
/* 按钮基础样式 */
.dede-form .btn {
    padding: 10px 20px;
    border: none;
    border-radius: 3px;
    background-color: #5a9fd4; /* 背景色 */
    color: white; /* 文字颜色 */
    font-size: 16px;
    font-weight: bold;
    cursor: pointer; /* 鼠标悬停时显示手型 */
    transition: background-color 0.3s, transform 0.2s; /* 背景色和缩放的过渡效果 */
}
/* 鼠标悬停在按钮上时的效果 */
.dede-form .btn:hover {
    background-color: #4a8fc4;
}
/* 鼠标按下按钮时的效果 */
.dede-form .btn:active {
    transform: scale(0.98); /* 轻微缩小,有点按下去的感觉 */
}
第三步:整合与最终代码
将以上所有 CSS 代码整合起来,你可以选择以下两种方式之一应用到你的 DedeCMS 模板中。
内联样式(直接写在模板文件里)
在你的表单代码上方或下方的 响应式设计:
在小屏幕设备(如手机)上,500px 的表单可能会溢出,我们可以使用媒体查询来优化。 美化单选/复选框:
DedeCMS 生成的单选框和复选框 必填项提示:
如果你的表单有必填项,可以在 然后在 CSS 中也可以给 号加点样式: 通过以上步骤,你就可以将 DedeCMS 默认的简陋表单,轻松地改造成一个美观、实用且符合你网站风格的表单了。<head> 部分添加 <style>
<!DOCTYPE html>
<html>
<head>
<meta charset="UTF-8">联系我们</title>
<style>
/* --- 在这里粘贴上面所有的 CSS 代码 --- */
.dede-form {
width: 500px;
margin: 20px auto;
padding: 20px;
border: 1px solid #e0e0e0;
border-radius: 5px;
background-color: #f9f9f9;
box-shadow: 0 2px 5px rgba(0,0,0,0.1);
}
.dede-form p {
margin-bottom: 15px;
display: flex;
align-items: center;
}
.dede-form label {
width: 80px;
text-align: right;
margin-right: 10px;
font-weight: bold;
color: #333;
}
.dede-form input[type="text"],
.dede-form input[type="file"],
.dede-form textarea {
flex: 1;
padding: 8px;
border: 1px solid #ccc;
border-radius: 3px;
font-size: 14px;
transition: border-color 0.3s;
}
.dede-form input[type="text"]:focus,
.dede-form input[type="file"]:focus,
.dede-form textarea:focus {
border-color: #5a9fd4;
outline: none;
}
.dede-form textarea {
min-height: 120px;
resize: vertical;
}
.dede-form .btn {
padding: 10px 20px;
border: none;
border-radius: 3px;
background-color: #5a9fd4;
color: white;
font-size: 16px;
font-weight: bold;
cursor: pointer;
transition: background-color 0.3s, transform 0.2s;
}
.dede-form .btn:hover {
background-color: #4a8fc4;
}
.dede-form .btn:active {
transform: scale(0.98);
}
</style>
</head>
<body>
<!-- 这里是你的 DedeCMS 表单代码,记得给 form 加上 class="dede-form" -->
<form action="/plus/diy.php" enctype="multipart/form-data" method="post" class="dede-form">
<input type="hidden" name="dede_fields" value="name,text;tel,text;content,multitext;file,file">
<input type="hidden" name="dede_fieldshash" value="...">
<p>
<label for="name">姓名:</label>
<input type="text" name="name" id="name" class="intxt">
</p>
<p>
<label for="tel">电话:</label>
<input type="text" name="tel" id="tel" class="intxt">
</p>
<p>
<label for="content">内容:</label>
<textarea name="content" id="content" rows="6" cols="60"></textarea>
</p>
<p>
<label for="file">附件:</label>
<input type="file" name="file" id="file" class="intxt">
</p>
<p>
<button type="submit" name="submit" class="btn">提交</button>
</p>
</form>
</body>
</html>
外部样式表(推荐,便于维护)
/templets/default/)下创建一个 CSS 文件,form.css。form.css 文件中。<head> 部分引入这个 CSS 文件。<!DOCTYPE html>
<html>
<head>
<meta charset="UTF-8">联系我们</title>
<!-- 引入外部 CSS 文件 -->
<link rel="stylesheet" type="text/css" href="{dede:global.cfg_templets_skin/}/form.css">
</head>
<body>
<!-- 表单代码,同样需要加上 class -->
<form action="/plus/diy.php" enctype="multipart/form-data" method="post" class="dede-form">
<!-- ... 表单内容 ... -->
</form>
</body>
</html>
第四步:高级技巧与注意事项
/* 在 form.css 末尾添加 */
@media screen and (max-width: 600px) {
.dede-form {
width: 95%; /* 在小屏幕上宽度为视口的95% */
padding: 15px;
}
.dede-form p {
flex-direction: column; /* 改为垂直排列 */
align-items: flex-start; /* label 和 input 顶部对齐 */
}
.dede-form label {
width: 100%; /* label 宽度占满 */
text-align: left; /* 文字左对齐 */
margin-bottom: 5px; /* label 和 input 之间加一点间距 */
margin-right: 0;
}
}
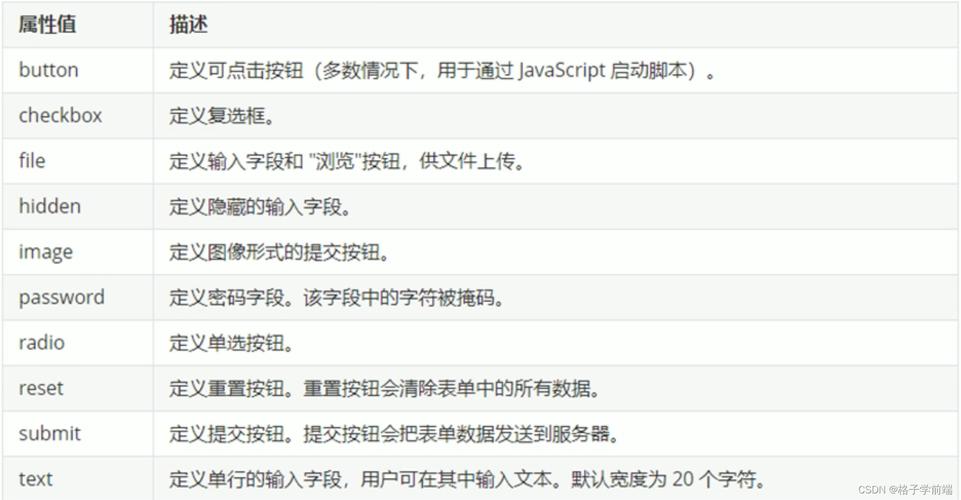
<input type="radio/checkbox"> 默认样式很难看,美化它们通常需要一些技巧,比如使用 label:after 伪元素来模拟自定义样式,这稍微复杂一些,但效果会非常好,你可以搜索 "CSS custom checkbox/radio" 找到很多教程。label 后面用红色 号标记。<p>
<label for="name">姓名:<span style="color:red">*</span></label>
<input type="text" name="name" id="name" class="intxt" required>
</p>
.dede-form label span {
color: red;
margin-left: 2px;
}


